Hi Thomas
About cutting I have really good result with
My diamond shank 462s on Mike poly’s!!
So I decide to cut on some PETG left overs
From the last time i embossed..
And my angle not working proper with PETG.
Probably will need new adjustment.
Cause i have around between 5 and 2 degree
and on polys no problems!!
Petg.. heu.. different.
Re: The farmer and his plow - When I set out to build a record cutter
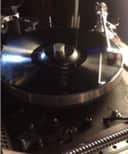
Here’s my angle and set up
You do not have the required permissions to view the files attached to this post.

-
farmersplow

- Posts: 371
- Joined: Thu Jun 17, 2021 3:43 am
- Location: Austria - Vienna
Re: The farmer and his plow - When I set out to build a record cutter
Hello Chany,
Your lathe construction looks very interesting. Especially the long carrier arm with the spring-loaded lever arm. Does the small stepper motor drive a counterbalance or does it lift the carrier arm - or does it do something completely different? The cutterhead also looks good - compact and small - great.
From the picture it looks like the rake angle is about 5°. I have almost no experience with cutting in PVC, but since PETG is softer, theoretically a lower angle than PVC should be good. Unfortunately, I can't see from the pictures how the diamond graver is suspended. Is it a torsion bar? Because if we're talking about angles, then it looks to me like the head has a VCA of 45°. That would be a bit much, but maybe the picture is deceiving. If you've found your ideal rake angle for PETG, I'd be interested to know where you ended up.
Keep up the great work and best regards
Thomas
Re: The farmer and his plow - When I set out to build a record cutter
Hey !
The cutter head Is a TKV made by Konstantin
Tokarev in Mexico and he made made vacuum
Tip with the moving angles mechanism.
Really well built!!!
Briefly, my machine is a mix of lot’s of things
Hahaha
I started with that old presto k8 and after a while I decide to pushed the limits and add
Some modifications.
I can cut mono and using the original tube amp
All refurbished!
Or going stereo ..
That’s why the goal of the stereo pushed me
To a unknown project road trip!
One of my friend at work got a 3D printers
So he helps me to built the parts to fit it on the track X and track Y (the Y is for the weight
and lift up and down for cut in cut out.
I drew all my ideas after experimenting with
The old K8 and I end up with that thing,
I want to stay a bit in the basic of that machine but 2024..
So with the help of my friend Eli and Konstantin Tokarev and
Mike for infos and stylus, polycarbonates..
And I forgot Jed in Berlin who sell me the
Platter motor I end up with this strange thing!
Hahaha
But seriously on Mike polycarbonates I end up
With really really good results!
I never expecting this!
I’m using My shank 462s stylus the heater
that Mike suggest me and I took a Vevor
made in China vacuum kit with the tank
For around 250$ Canadian $$
1 horse power 12cfm cause I finally notice
That you need something strong to get all the swarf back in the tank , hahaha cause the
First one was not anough strong and the swarf
Stuck a bit on my stylus because of the heat
So I had to shut down the volt meter quick
Shut down the pump and stop the cnc
Computer.. hahaha
I finally got lucky I cleaned off the swarf gentle
With a soft brush with acetone..
And saved my Shank..
But anyway, with this set up it works
Perfectly for now. I can cut records cut in
Cut out and they are playable on my many turntables in the studio and at home.
My only problem I had in the passed couple days is cutting PETG it doesn’t work with
My set up..
Probably too soft ?? I don’t know?
On the polys it makes good cut no skiping
At the playback I can listen the play back
Loud with no acoustic feedbacks..
And the PETG.. what a hard job.. do
Greetings
From

The cutter head Is a TKV made by Konstantin
Tokarev in Mexico and he made made vacuum
Tip with the moving angles mechanism.
Really well built!!!
Briefly, my machine is a mix of lot’s of things
Hahaha
I started with that old presto k8 and after a while I decide to pushed the limits and add
Some modifications.
I can cut mono and using the original tube amp
All refurbished!
Or going stereo ..
That’s why the goal of the stereo pushed me
To a unknown project road trip!

One of my friend at work got a 3D printers
So he helps me to built the parts to fit it on the track X and track Y (the Y is for the weight
and lift up and down for cut in cut out.
I drew all my ideas after experimenting with
The old K8 and I end up with that thing,
I want to stay a bit in the basic of that machine but 2024..
So with the help of my friend Eli and Konstantin Tokarev and
Mike for infos and stylus, polycarbonates..
And I forgot Jed in Berlin who sell me the
Platter motor I end up with this strange thing!
Hahaha
But seriously on Mike polycarbonates I end up
With really really good results!
I never expecting this!
I’m using My shank 462s stylus the heater
that Mike suggest me and I took a Vevor
made in China vacuum kit with the tank
For around 250$ Canadian $$
1 horse power 12cfm cause I finally notice
That you need something strong to get all the swarf back in the tank , hahaha cause the
First one was not anough strong and the swarf
Stuck a bit on my stylus because of the heat
So I had to shut down the volt meter quick
Shut down the pump and stop the cnc
Computer.. hahaha
I finally got lucky I cleaned off the swarf gentle
With a soft brush with acetone..
And saved my Shank..
But anyway, with this set up it works
Perfectly for now. I can cut records cut in
Cut out and they are playable on my many turntables in the studio and at home.
My only problem I had in the passed couple days is cutting PETG it doesn’t work with
My set up..
Probably too soft ?? I don’t know?
On the polys it makes good cut no skiping
At the playback I can listen the play back
Loud with no acoustic feedbacks..
And the PETG.. what a hard job.. do
Greetings
From

Re: The farmer and his plow - When I set out to build a record cutter
Here under the cutting head
You do not have the required permissions to view the files attached to this post.
-
farmersplow
- Posts: 371
- Joined: Thu Jun 17, 2021 3:43 am
- Location: Austria - Vienna
-
farmersplow
- Posts: 371
- Joined: Thu Jun 17, 2021 3:43 am
- Location: Austria - Vienna
Re: The farmer and his plow - When I set out to build a record cutter
New CH-9 cutting head (part 5)
10/2023
After the lighting has hardened, I can test whether the thing fits into the cutterhead. The shape and screws fit perfectly! - Lucky.
.
. .
.
But there are still a few other parts to be made, such as the retaining bolt with which the cutterhead is later mounted in the suspension unit or simple insulating plates.
.
. .
. .
.
The front cover plate also has to be made first.
.
. .
.
Again, I check that everything fits together well. I have prepared several housings so that I can carry out various tests later, with different angles, lengths and damping in direct comparison.
.
. .
.
Apart from the brass bolts at the front, which I think look a little too long, I like the second assembly quite well.
.
. .
. .
.
I placed my logo on it to give the whole thing an image.
.
. .
.
(The drive rods in the picture are not yet correct, but from one of the "old" drivers).
Greetings from Austria
Thomas
You do not have the required permissions to view the files attached to this post.
-
farmersplow
- Posts: 371
- Joined: Thu Jun 17, 2021 3:43 am
- Location: Austria - Vienna
Re: The farmer and his plow - When I set out to build a record cutter
Lesson on loudspeakers and drive coils
10/2023
I have learned. What I measured and what my opinion is:
In my post here are already quite a lot of hits and therefore I assume that many trolls follow this post. This also increases the unpleasant feeling that I am responsible for not writing nonsense or falsehoods. I would therefore like to point out that I don't know everything and am still experimenting. If I spread nonsense, then those who know better are invited to set the record straight. So I write about my experiences, what I think and what conclusions I draw.
Over the course of time, the question has repeatedly arisen as to which speakers I should use for the Cutterhead.
In my opinion, you can use any loudspeaker and none is suitable for the job. Speakers are basically built to reproduce audio signals and not to cut grooves into a surface.
To solve the task of cutting, you need a magnet, a magnetic field that closes over an iron core and a coil that is moved back and forth by the current (alternating current) in the magnetic field. Nothing else is necessary.
(I will now leave out alternative cutting methods, such as groove production with laser, CNC or whatever else is available).
The quality of a cone loudspeaker in the audio sector lies in how well it can reproduce the audio signal into sound waves. (Very expensive speakers are usually also speakers that can convert audio signals into sound waves very well and without distortion). To do this, manufacturers use certain magnets, materials for diaphragms and spiders, diaphragm shapes and sometimes also cooling liquid/cooling gel. The size and shape of magnets, coils, spiders and diaphragms, as well as the choice of materials, also change the sound image. But most of the things that are responsible for the excellent sound characteristics of these audio speakers are not used for the purpose of record cutting and show completely different characteristics in the application.
As soon as you remove anything from the speaker or stick or screw anything to the speaker, it changes its characteristics completely. (My opinion).
Mid-range or high-frequency speakers are usually suggested. There is a good reason for this, because these speakers are relatively small and the problem with cutting is more in the high frequency range. The idea of using a bass speaker with a coil diameter of 2" or 50mm, where the load-resistant coil can withstand 100 watts or more, is almost impossible. In order for these coils to withstand this load permanently, the coil wire is very thick and therefore also very heavy. This weight cannot be moved back and forth quickly. - This is why they are bass loudspeakers that stop at a few hundred Hz. Tweeters have fine coil wires, are lighter and can therefore reach frequencies of 20kHz. But if you permanently run 100W over them, it's also over in the form of smoke plumes. This does not mean, however, that tweeters cannot be driven with 300W (at 18kHz) or with 1W (at 40Hz). They also move at 1Hz. Unlike bass loudspeakers, tweeters driven by a 40Hz tone do not manage to reproduce a rich, audible bass tone for our ears.
However, this is not important when cutting (or pressing) grooves. After all, the graver only moves back and forth about 300µm. Only a little for an audible sound, but completely sufficient for a good cutting pattern. (Using the inverse RIAA characteristic curve "IRIAA", the bass signal is even extremely reduced). Since high frequencies (with IRIAA) are strongly amplified at the coil of the "loudspeaker", 300W can be handled there for a short time, even though it is only a 4W loudspeaker. "Short-term" is the key here.
Conclusion: In my opinion, you can use any speaker and none is suitable for the task. The audio speaker spider would have to be made harder (it centers the coil over the magnet). The audio speaker cone (or dome) would have to be removed (you don't need it because you don't need any sound). Then only the housing, the magnet, the coil and the spider (or something that serves as a centering element) remain. If you then cut around the housing and replace the spider, what remains of the original speaker? And if you then fit a cone with a drive rod, the original characteristic curve of the loudspeaker is gone for good.
What then? Yes, then the game of experimentation begins in order to finally obtain a "new" good characteristic curve.
You are well advised to use a 4-8 Ohm loudspeaker. It should have a housing that can be easily integrated into the planned cutting head and it should have a relatively light and small coil. Relatively small coil means a compromise between durability and weight.
It's just my opinion and I may be wrong. I have learned, but never enough.
.
. .
.
But that's the end of the philosophy.
I decided on the resonance loudspeaker, although not much is left of it apart from the housing and the magnet. Maybe I'll change the housing of this resonance speaker and make it a bit smaller?
But what kind of magnet is in there and why am I using it? Why don't I change everything right away, it doesn't matter anymore? The answer is simple: I would basically build the magnet and the cabinet the same way again, because I think it's brilliant for the purpose.
Here is a picture of the housing with magnets (the round part in the middle):
.
. .
.
With a little patience (and acetone) you can loosen the magnet part and its bonding and then remove it. If the housing didn't have a hole at the back, I wouldn't have been able to do it because the magnet is very strong.
.
. .
. .
.
The housing is actually just a piece of round iron. There's nothing special about it.
.
. .
.
The magnet, however, is strikingly different.
Strictly speaking, it consists of three parts. Two round magnets and an iron separating disk with a hole.
.
. .
.
With patience (and acetone) you can also separate these three parts from each other.
.
. .
.
It is noticeable that the two magnetic plates are each mounted with the same polarity on the metal plate. I have made a schematic diagram of this:
.
. .
.
During my first attempts, the question arose as to where exactly the coil is located in this arrangement.
.
. .
.
Interestingly, the coil sits exactly above the metal plate. As it is difficult to describe, I have made further illustrations:
.
. .
.
Here is another detailed view for a better understanding.
.
. .
.
When building the coil and spider, it is important that the arrangement of the coil is ultimately correct. And since I can't rebuild this magnet construction for 20 euros, I take this resonance loudspeaker and use the housing and magnet.
Greetings from Austria
Thomas
You do not have the required permissions to view the files attached to this post.
-
diy_cutter

- Posts: 66
- Joined: Tue Apr 24, 2012 9:27 am
- Location: Ukraine, Kyiv
Re: The farmer and his plow - When I set out to build a record cutter
Hello Thomas.
I see significant progress in your project. Glad to see you still have the energy and drive to continue. I agree with you that many here read more than write. And without feedback, many enthusiasts quickly burn out. And since I write quite rarely myself, I will correct myself. After all, your excellent project and much knowledge (and your experience is growing, of course) inspires me and many other trolls!
Thank you!
Eugene from Ukraine

-
farmersplow
- Posts: 371
- Joined: Thu Jun 17, 2021 3:43 am
- Location: Austria - Vienna
Re: The farmer and his plow - When I set out to build a record cutter
Thank you Eugene. ...and yes, more feedback would be nicediy_cutter wrote: ↑Mon Mar 04, 2024 6:22 pmHello Thomas.
I see significant progress in your project. Glad to see you still have the energy and drive to continue. I agree with you that many here read more than write. And without feedback, many enthusiasts quickly burn out. And since I write quite rarely myself, I will correct myself. After all, your excellent project and much knowledge (and your experience is growing, of course) inspires me and many other trolls!
Thank you!
Eugene from Ukraine
Thomas
-
farmersplow
- Posts: 371
- Joined: Thu Jun 17, 2021 3:43 am
- Location: Austria - Vienna
Re: The farmer and his plow - When I set out to build a record cutter
New CH-9 cutting head (part 6)
10/2023
But now on with the cutterhead. As an alternative to the external suction tube, I would like to try a suction tube on the cutterhead. The disadvantage is that central positioning is not possible and the cutting thread has to be sucked off slightly to the side. The suction tube must therefore be bent. The advantage is that even with record blanks that are not 100% flat, the distance between the cutting stylus and the suction tube always remains constant because the suction tube moves with the up and down movements.
So I made brass brackets for the suction tube and brackets for the holding wire of the torsion tube.
.
. .
.
I had to build several models for the suction pipe until it finally fitted.
.
. .
. .
.
Finally, I made the end of the suction tube a little flatter, as there is not much space in the area of the cutter. I also soldered on a small ring so that the suction hose holds better and seals tightly.
.
. .
.
Greetings from Austria
Thomas
You do not have the required permissions to view the files attached to this post.

Re: The farmer and his plow - When I set out to build a record cutter
Tout ces travaux, essais partages sont magnifiques et m'inspient beaucoup ! Merci
-
farmersplow
- Posts: 371
- Joined: Thu Jun 17, 2021 3:43 am
- Location: Austria - Vienna
Re: The farmer and his plow - When I set out to build a record cutter
Tu as fait un long et impressionnant chemin pour en arriver ici et j'espère parvenir à d'aussi bons résultats 

-
displacedsnail
- Posts: 22
- Joined: Sat Aug 12, 2023 8:34 am
- Location: Philadelphia, PA
- Contact:
Re: The farmer and his plow - When I set out to build a record cutter
Hello Thomas, just popping in to say this is all very impressive! I'm lost when I try to actually follow what you're doing, though quite interested in following along and learning more about it. It's too bad I only got my first lathe late last year - I was a vendor last spring at Fanzineist International Art Book Fair in Vienna, if I'd known I would have asked to come see what it looks like in person! Keep up the good work,
- Joe
- Joe
-
farmersplow
- Posts: 371
- Joined: Thu Jun 17, 2021 3:43 am
- Location: Austria - Vienna
Re: The farmer and his plow - When I set out to build a record cutter
Hi Joe, the next time you're in Vienna, get in touch and drop by. We'll plow a furrow, drink coffee and chat about the world.displacedsnail wrote: ↑Wed Mar 13, 2024 7:33 amHello Thomas, just popping in to say this is all very impressive! I'm lost when I try to actually follow what you're doing, though quite interested in following along and learning more about it. It's too bad I only got my first lathe late last year - I was a vendor last spring at Fanzineist International Art Book Fair in Vienna, if I'd known I would have asked to come see what it looks like in person! Keep up the good work,
- Joe
Thomas
-
farmersplow
- Posts: 371
- Joined: Thu Jun 17, 2021 3:43 am
- Location: Austria - Vienna
Re: The farmer and his plow - When I set out to build a record cutter
New CH-9 cutting head (part 7)
11/2023
Now I was finally able to assemble the complete new FP-9 cutting head. Driver coils, feedback coils, torsion tube with V-spring, suction tube, stylus heater, lighting and connector plugs.
.
. .
. .
.
Then I installed the cutterhead as a test and adjusted it with the alignment laser. The dimensions and positioning of the cutterhead fit into the overall structure. The adjustment devices for positioning also work very well.
.
. .
. .
.
Unfortunately, I cannot yet carry out a test cut because the "new" lathe is not yet ready. So I could only simulate the start and end positions using software to check whether everything works out spatially.
.
. .
. .
.
Before I can carry out the first test cuts, I have to program the control software and finalize the suspension box. This includes areas such as oil damping, lever mechanism, groove depth control, contact force measurement, automatic lifting of the cutterhead, etc.
The extraction system also needs a makeover, as do the pump housing, chip container and control system.
And because I'm already a little impatient to hear what the new cutterhead sounds like, I'll have to hurry a little now to complete the most necessary areas.
Greetings from Austria
Thomas
You do not have the required permissions to view the files attached to this post.
Re: The farmer and his plow - When I set out to build a record cutter
WoW!!!
Super with the light under !!
Mind blowing !
Great complex job!
Chany
Super with the light under !!
Mind blowing !
Great complex job!
Chany
Re: The farmer and his plow - When I set out to build a record cutter
Absolutely fantastic.
-
farmersplow
- Posts: 371
- Joined: Thu Jun 17, 2021 3:43 am
- Location: Austria - Vienna