The material I mentioned is called NinjaFlex. There are two versions, the standard "NinjaFlex", and one called "SemiFlex". I'm using the SemiFlex.
It's available here:
http://www.ninjaflex3d.com/
There is one hook: You won't be able to pint this with a stock print head like a MK8 without making a new part for the print head. The problem is that this material is so flexible it wants to deform when the print head tries to shove it into the melt chamber. So you need to support the material the entire distance from the roller and gear to the hot end supply tube.
Below is a picture from one of the user groups out there that shows what needs to be done:
It turns out that there are many files on Thingiverse that are free for the taking to make the changes super simple. Here is one for example:
LeapFrog Creatr Extruder Modifications for NinjaFlex
http://www.thingiverse.com/thing:321258
A few more things to note:
You can only print at about 1/2 the speed you normally would with plastic. I found 20mm/s travel was about right. Also, you have to turn off "retract" entirely and just let it ooze. Because it's flexible, it takes a while to build up pressure and flow again after a retract. The other thing is I found that it leaks past all the threads on my hot end and plastic doesn't do that. I had to watch the print periodically and remove excess leakage so it wouldn't spoil the print. Next time I have the print head apart I'll need to put some thread locker on there.
How does it print?
Like a dream! It bonds to itself like crazy. No chance of de-lamination. The only trick is finding something to glue it with. It looks like I found the right stuff... After having used this I'm 99.9% sure it's the same stuff that was used to glue these drivers together in the fist place. And get this, it says if it thickens up too much you can thin it with Acetone. Remember, that's how I got these drivers apart in the first place!
I bought this glue from Springfield Speaker Repair on Ebay here:
http://stores.ebay.com/Springfield-Speaker-Repair
I just applied it directly from the bottle to the NinjaFlex, inserted the carbon fiber disc and then put a bucket edge over the center until the glue set up. Then I flipped them over and applied glue on the other side. Here you see the top and bottom side.
And yes, I made a bunch of these at the same time. Each and every diaphragm came out exactly like the previous one.
Next up, I used a paint brush to apply the goo to the coils. I also glued the outside edge of the coil which is a bit messey and I'm not sure was necessary. But the glue contracts quite a bit as it dries so it really didn't impact anything.
I used a piece of aluminum to dispense the goo on for gluing since I could clean it with Acetone.
Tomorrow, I'll show you what I'm up to with the new head body.
Bryan
-
EpicenterBryan

- Posts: 738
- Joined: Sun Aug 10, 2014 9:01 pm
- Location: Eugene, OR USA
Re: Project "Groove Scribe"- A DYI stereo 45/45 head.
You do not have the required permissions to view the files attached to this post.
-
inspector77

- Posts: 78
- Joined: Mon Nov 17, 2014 10:59 am
- Location: Málaga - Spain
- Contact:
Re: Project "Groove Scribe"- A DYI stereo 45/45 head.
Looks good Brian!

-
EpicenterBryan
- Posts: 738
- Joined: Sun Aug 10, 2014 9:01 pm
- Location: Eugene, OR USA
Re: Project "Groove Scribe"- A DYI stereo 45/45 head.
The mechanical update will have to wait until tomorrow. Lots of pictures to take.
But I did want to pass on that I did a destruct test on one of those Nylon Bridge diaphragms to see if the glue held. It had been about 2 months since I played with the driver and I discovered the glue that seamed to have some pliable proprieties back then turned to stone. And it was fairly easy to peal the Nylon bridge material off of the coil and carbon fiber disc. Not super easy, but once it started to peal it was like butter.
I also wanted to share what the NinjaFlex SemiFlex does when retract is turned off and you try to print more than one part at a time. Up until now I had been printing one part at a time. Here is what happened when I just printed 4 of the same items and didn't think about the consequences.
These parts were not critical so I just cleaned them up. But since then I have set files up to complete one part before starting the next part... One other thing I should pass on is that you might want to turn off "randomize starting points" so you don't have unnecessary moves as the material oozes.
One other thing I want to share on this post is that I played around with modifying the GCODE output from the Gcoil software I mentioned earlier. It's easy to edit the file to interleave the layers. Below is what I'm planning to do and have modified the Gcode output to accomplish. This is for the feedback coils.
The wire size is 38awg, 0.1mm.
The idea here is that I'll have temporary bobbin end stops, with Teflon tape doughnuts applied so as the coil winds directly on the push rod segments and I can apply glue as it's wound. Once dried, I'll remove the end stops and I should be good to go with the coil wound directly on the push rod segments. I'll be trying this out this weekend.
Wish me luck!
Bryan
You do not have the required permissions to view the files attached to this post.

Re: Project "Groove Scribe"- A DYI stereo 45/45 head.
Fantastic!
In awe watching this thread for some time...
Amassing great knowledge
Cheers
Cheers,
recordboy
recordboy

Re: Project "Groove Scribe"- A DYI stereo 45/45 head.
Hi Bryan, I'm following this thread since a long time, and I'd like to thank you for all the culture you are spreading with your updates.
Your work will help me a lot as reference to build my cutting head, and I'd like to ask you why you chose 3mm as push rods diameter, and how this size affects the movement of these rods and so the final audio/frequency response.
This is just to understand with what size I could start experimenting.
Obviously different push rods diameters will need different feedback coil designs in terms of coils and layers number.
Thanks again
Cheers
-
EpicenterBryan
- Posts: 738
- Joined: Sun Aug 10, 2014 9:01 pm
- Location: Eugene, OR USA
Re: Project "Groove Scribe"- A DYI stereo 45/45 head.
Here is an update.
I got the push rod length figured out, cut a bunch with an under-powered Harbor Fright cut off tool and drilled 1mm holes in the center. So now, I'm ready to wind the coils. I also found an interesting non-magnetic spring material called Phosphor Bronze. I'm thinking about using this for the short segments that connect at the torque tube. The great thing about this is it's non-magnetic, easier to find and safer than Beryllium copper and can even be soldered.
I decided to go with solid aluminum push rod segments. For now I have abandoned magnesium, carbon fiber, and tubular aluminum for various reasons. The segments are now 28mm long, 3.12mm (1/8") diameter. Each end is drilled 1mm, about 8mm deep. That way if I wind the coil on the wrong end it's already drilled. And it also reduces some mass.
Unfortunately, I drilled the carbon fiber discs 3mm, and will need to increase it to 3.12mm.
The back of the head was originally intended to be attached with cap screws. I ended up having a friend TIG weld it in place after I broke a drill bit and it got stuck. Two additional holes are for mounting the V-spring at the back of the torque tube, and there is a 1mm hole for the piano wire. The very bottom of the V on the back mounting plate still needs to be milled off, drilled and tapped for a set screw from the bottom for the piano wire.
On the inside, you will see some copper caps. Those need to be trimmed a bit shorter, and NinjaFlex spacers that keep them centered and attached to the magnet ends also need to be a bit shorter. But the idea is that the feedback coils will be inside the caps. On the outside of the caps will be a small isolated PCB for attachment of the coil wires and lead wires. There are also spacers shown. Those will be for attachment of V springs to make sure the feedback coils stay centered with vertical cutting load. The length of those is not correct. I have a bunch of spacers yet to arrive including the short ones for the rear V-spring.
The copper caps are isolated from everything, but ground wires could be attached. I really don't know if they are needed or not. If nothing else they look good. But Ciuens has had some interesting results in one of his videos when messing with his feedback so I figured it was easy to add now, much harder later.
I also have 2" copper disc made that could go anywhere. They could go between the head body and 4mm shield, or between the shield and driver, or they could also be trimmed and put inside the head. For that matter, the caps could be soldered to it. I just don't know.
Here is a side shot showing the magnet and another NinjaFlex spacer. This was necessary since I changed the outer and inner length of the magnet (as well as the length) but had already drilled the brackets for the previous magnet. You will also see two blind screw caps for the V-spring spacers. That was a bad move since they are covered by the steel magnetic shield disc. I should have just tapped the hole and used spacers with male studs. Live and learn.
The magnet is now 1/2" long. The bracket is 1/4", so on the inside it extends an additional 1/4". That is where the copper cap and spacer is installed.
Now on the outside is where the 4mm steel shield goes and contacts the magnet which is the same polarity of the center magnet in the driver creating a magnetic bottle cap as we have seen in the FEMM simulations. On top of that is a NinjaFlex spacer to provide about 3mm of clearence so the driver screws don't contact the shield. It could be any material. It's just a spacer but since I needed to print new ones, that's what I used.
In the background you can see one of the copper caps with a NinjaFlex spacer inside. That becomes a tight fit on the magnet end inside the head.
That's it for tonight.
Next step is coil winding... Then what to do about a new torque tube.....
Bryan
You do not have the required permissions to view the files attached to this post.
-
EpicenterBryan
- Posts: 738
- Joined: Sun Aug 10, 2014 9:01 pm
- Location: Eugene, OR USA
Re: Project "Groove Scribe"- A DYI stereo 45/45 head.
Hi Casanova,Casanova wrote:...and I'd like to ask you why you chose 3mm as push rods diameter, and how this size affects the movement of these rods and so the final audio/frequency response.
The 3mm size is not magic, it's just a common size I can find for various materials. In America the next closest size is 1/8" which is 3.12mm. Since I do lots of things on a 3D printer I have tried to make a mental switch to metric if at all possible.
Because of that, it does turn out to be hard to find many metric sizes in this little town I live in, and I end up ordering stuff on Ebay from China which takes time.
As far as push rods go - you could use what ever you want. Lighter is better but there is a catch. If you are going to try feedback, the material and distance from the motivational force does make a difference. Many of us have run into phase changes on the feedback signal which affects the ability to close the FB loop. Some of those issues relate to the propagation delay of a specific push rod material (and the length). Some materials that may be less dense may also be flexible. Some materials may be magnetic.
I am not an expert, I am just an experimenter sharing what I am running into along this crazy path.... Hoping to save someone time in messing with something that doesn't work as well as something else.
I don't have a full answer to your question. I have many questions myself.
Bryan

Re: Project "Groove Scribe"- A DYI stereo 45/45 head.
Physics would care to disagree with part of this statment, fyi. Imagine you have a rod measuring 12" in length. You put a mark at 6" and another at 10" from one end of the rod. You place two cameras over each mark with a distance ruler above each mark. You align the rulers such that each mark is at the same tick mark on each respective ruler. You record the two camera views as the rod is moved along an axis parallel to the rods length. The rod is moved back and forth and an even speed. You can then use video editing sofware to overlay the two recordings and line up the ruler and the marks on the rod on screen in the software. The two ticks movements will match each other exactly. There is no delay. Just say'n. The notion that the length of the push rod with respect to feedback coil placement makes zero difference. Unless the rod was several miles long. They you will encounter observer based time distortions according to Einstein. However, that doesn't mean that the same action isn't happening simultaneously, it just means it would clock differently for each observer. But, I don't think you're going to make a push rod several miles long.EpicenterBryan wrote:Some of those issues relate to the propagation delay of a specific push rod material (and the length).
Another way to exemplify what I'm saying is to imagine two points in space. Then connect them with a line. Now imagine that line in front of you perpendicular to the ground (following gravity). Make the line move up and down in your mind. Now, imagine plotter paper on a roll that is running behind the line from your left to your right (perpendicular with the line). Imagine placing plotter pens at each point of the line. You will now be drawing two identical sine waves on the plotter paper simultaneously with no phase distortions. Regardless of the delta between the two points.
Cutting, Inventing & Innovating
Groove Graphics, VMS Halfnuts, MIDI Automation, Professional Stereo Feedback Cutterheads, and Pesto 1-D Cutterhead Clones
Cutterhead Repair: Recoiling, Cleaning, Cloning of Screws, Dampers & More
http://mantra.audio
Groove Graphics, VMS Halfnuts, MIDI Automation, Professional Stereo Feedback Cutterheads, and Pesto 1-D Cutterhead Clones
Cutterhead Repair: Recoiling, Cleaning, Cloning of Screws, Dampers & More
http://mantra.audio
-
EpicenterBryan
- Posts: 738
- Joined: Sun Aug 10, 2014 9:01 pm
- Location: Eugene, OR USA
Re: Project "Groove Scribe"- A DYI stereo 45/45 head.
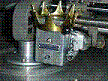
Here is the next update.
The entire day was spent trying to wind coils. Each time I try this I have more and more respect for people who mess with this...
The first task was to put the coils in the correct position.
Temporarily, I installed a push rod. And knowing I am using 3mm wide coils, I wanted 1/2 inside, and 1/2 outside the magnet. As we saw from other testing, the most useful region where the magnetic field was at the correct orientation with the coils is right at the edge. Lesser so inside or outside. So I split the difference for ease of alignment. Then I placed 1.5mm worth of shims on the magnet, and then installed the end-stop. It turns out the end of the push rod was exactly at the end, so I only needed to measure this once.
Then I used Teflon tape (and drilled a 1/8" hole in it) to go over the end of the end-stop. The Teflon is there so the nail polish coating I'm using to hold the coil together didn't stick to the end stops. Next, I did the same on another end-stop and put the two Teflon surfaces facing each other. Then put 3mm worth of spacers in between to set the 3mm wide bobbin length.
I made a few of the 10 layer coils I noted before. One had slightly more wire on one end than the other and rubbed in the magnet. The other one was better but there was no way I was going to keep the tolerances that tight so I eliminated 4 layers in the coil.
CONTINUED ON NEXT POST:
You do not have the required permissions to view the files attached to this post.
-
EpicenterBryan
- Posts: 738
- Joined: Sun Aug 10, 2014 9:01 pm
- Location: Eugene, OR USA
Re: Project "Groove Scribe"- A DYI stereo 45/45 head.
Here is what one of the smaller (6 layer) coils looks like with the end stops still in place on the winder:
And what it looks like once the end stops get removed from the 1/8" core:
After a whole day messing around, I have 4 decent push rods with coils and one spare that has too many windings on one end but it fits.
All in all, I'm not thrilled the mass is as high as it is but my other options were too pliable. I think this number is reasonable.
That's it for tonight.
Bryan
You do not have the required permissions to view the files attached to this post.
Re: Project "Groove Scribe"- A DYI stereo 45/45 head.
If that rod is made of aluminum then you are likely going to have eddy-current issues. The eddy-currents induced in aluminum from moving it in a magnetic field cause the aluminum to resist the movement and will fight the drive coil's em flux. High frequencies will, of course, suffer greatly by this phenomenon and the higher end will be completely eliminated. Not sure if you know this or not. Thought I would mention.
I'm machining my bobbin/pushrod combo parts in aluminum now. But, I'm adding a feature to diminish the eddy-current effects on the bobbin side of the part. The bobbin/push rod combo part that I will have in production models of my Mantra cutterheads will actually be made from ceramic. I will use one of the aluminum parts I've lathed to have a mold made for the ceramic part production. Ceramic is light weight, dissipates heat very nicely, and has little to no magnetic or em interaction. It is actually an ideal material for these parts.
For what it's worth. You may consider pipe instead of solid round bar. I'd be happy to lathe some indents into some pipe or solid bar stock for you on the house. That may be easier to wind that way directly into a channel in the push rod. And, it will help you with clearance in your ring. Finally, and most importantly, it will reduce the overall weight of the part. When you add the moving parts of your springs and the linkage I would guestimate that you will be between 2 and 3 grams per channel. That is a lot of weight. Hollowing out the rod will help reduce that nicely.
I will also say that Fatrecco and yourself have figured out that embedding the coil within the magnet is one of the secrets to excellent response by maximizing the interaction between the coil and the magnet. That is how speakers are made. That is how the Neumann SX cutterhead is made. FYI, the engineering in the SX is so refined that the gap between the coil and the magnet is 2 Mils (0.002"). That is extremely tight. And is part of the reason why the head sounds the way it does. To have such a small gap, you need to use flat wire that is made to exacting tolerances, and you need to have very well engineered springs to limit the teetering of the bobbin/push rod to a very tight range. Any rubbing of the coil on the magnet will be heard in transcribed grooves. It sounds like distortion. You can tell something is tapping in the recorded audio. I had this issue in earlier versions of Project Bladerunner.
However, unlike Fatrecco, your approach is only taking advantage of 1/2 of the possible interaction. You're missing the center of the coil. Fatrecco uses a steel disc and a steel rod to channel the ring magnet's flux into the center of the coil. What you may not know is that the center of the coil is where the highest concentrated em flux occurs. It is the proverbial sweet spot. If you are only going to cover one side of the coil, the middle is really the ideal place. Both the outside and the inside is best, of course.
Final bit of data. Aluminum has 0.0000005 the magnetic relative permeability as Iron. So, no worries about channeling em flux directly to the feedback coil(s) through the Aluminum since it has such a high reluctance to alternating em. Actually, about the same relative permeability as a Neodymium magnet, air or wood.
The other nice thing about an Aluminum bobbin and rod is that you will have very nice heat dissipation from the coil through the aluminum. However, you may have the potential to heat up the feedback coils depending on how much you drive the coil and how close the feedback coils are. If the temp of the feedback coils increases then their resistance will also increase and their response will drop. The drop won't happen until after a certain amount of time driving the drive coil and generating heat. As the heat travels up the rod, it will start to change the resistance of the feedback coils.
Nice work. Keep at it.
Cutting, Inventing & Innovating
Groove Graphics, VMS Halfnuts, MIDI Automation, Professional Stereo Feedback Cutterheads, and Pesto 1-D Cutterhead Clones
Cutterhead Repair: Recoiling, Cleaning, Cloning of Screws, Dampers & More
http://mantra.audio
Groove Graphics, VMS Halfnuts, MIDI Automation, Professional Stereo Feedback Cutterheads, and Pesto 1-D Cutterhead Clones
Cutterhead Repair: Recoiling, Cleaning, Cloning of Screws, Dampers & More
http://mantra.audio
Re: Project "Groove Scribe"- A DYI stereo 45/45 head.
Awesome work, Bryan!
Just a bit of tangental discussion to clear up here:
As a side note, the camera analogy isn't a good place to work from, as cameras collect information generally at a rate of 24-36 frames-per-second. Audio will easily be measured at 96000 samples-per-second.
Just a bit of tangental discussion to clear up here:
Todd, this is a little confusing to me – I think its just the way you are wording things. But for my understanding, please bear with me in clearing this up. In the first version of your explanation, you fail to mention how the energy is being induced in the rod to make it move. In the case of a cutterhead, the energy is induced from one end of the rod [at the drive coil]. Considering 'sound' is waves propagating through a medium, the rod material and its length is in fact a huge consideration because the distance from the 'source' of energy [drive coil] and the 'receiver' of that energy [feedback coil] is separated by a medium [the pushrod material] and that medium has a sound propagation coefficient. This information has already been discussed in this forum, refer here:opcode66 wrote:
Physics would care to disagree with part of this statment, fyi. Imagine you have a rod measuring 12" in length. You put a mark at 6" and another at 10" from one end of the rod. You place two cameras over each mark with a distance ruler above each mark. You align the rulers such that each mark is at the same tick mark on each respective ruler. You record the two camera views as the rod is moved along an axis parallel to the rods length. The rod is moved back and forth and an even speed. You can then use video editing sofware to overlay the two recordings and line up the ruler and the marks on the rod on screen in the software. The two ticks movements will match each other exactly. There is no delay. Just say'n. The notion that the length of the push rod with respect to feedback coil placement makes zero difference. Unless the rod was several miles long. They you will encounter observer based time distortions according to Einstein. However, that doesn't mean that the same action isn't happening simultaneously, it just means it would clock differently for each observer. But, I don't think you're going to make a push rod several miles long.
Another way to exemplify what I'm saying is to imagine two points in space. Then connect them with a line. Now imagine that line in front of you perpendicular to the ground (following gravity). Make the line move up and down in your mind. Now, imagine plotter paper on a roll that is running behind the line from your left to your right (perpendicular with the line). Imagine placing plotter pens at each point of the line. You will now be drawing two identical sine waves on the plotter paper simultaneously with no phase distortions. Regardless of the delta between the two points.
Here Markrob has calculated the phase shift found in 44mm of steel and the results are far from insignificant.markrob wrote:
I did some thumbnail calcs on the phase shift due to the distance from your driver to the pickup. You indicated that distance is about 44 mm. I forget what material you are using for the rod, bur lets use steel as an example. The speed of sound in a steel rod is in the range of 6000 m /sec.
http://www.engineeringtoolbox.com/sound ... d_713.html
Very fast as compared with air (~343 m / sec). The formula for phase shift in degrees vs. delay time in seconds and frequency in Hz is:
Phase shift = -360 x F X t
The time delay in steel at a distance of 44 mm = 44 mm / 6000000 mm / sec = 7.3 us. That doesn't sound like much but...
At 20 Khz, that results in a phase shift of -52 degrees. That not insignificant. This is a very rough approximation as we don't know the speed of sound in the rod you are using. But I think its in the range.
As a side note, the camera analogy isn't a good place to work from, as cameras collect information generally at a rate of 24-36 frames-per-second. Audio will easily be measured at 96000 samples-per-second.
Re: Project "Groove Scribe"- A DYI stereo 45/45 head.
Let me be clear. The scenario you are describing is more apt to a loudspeaker scenario and measuring the movement of things around it through the air.
In a cutterhead things are quite a lot different. To be a fair comparison to a cutterhead in the scenario you've described, we would be measuring the movement of a speaker's diaphragm directly. The difference lies in being able to measure the movement of the vibrating object (wave source) by going along for the ride with the drive coil. If you are instead propagating through air first and then through another medium (likely solid and possibly not rigid) before being measured then naturally distance matters. But, that simply is not the case here. In the case of the cutterhead, the feedback coil is directly coupled to the drive coil by a very rigid material. Meaning that there is no delay in the movement of the feedback coil with respect to the drive coil. They trace the same path in space simultaneously. The EM/M interaction has already been converted to force in motion and the rod that couples the feedback to the drive coil is now simply acting under Newtonian physics. In no way shape or form do the vibrational waves, i.e. the audio imparted to the air (which has been forced to move by the movement of the transducer piston) induce the current in the feedback coil. The force in motion that the drive coil creates in harmony with the fixed pole magnet is now simply a mass and a vector and the feedback coil is hanging out at the tip of the rocket. Do you see now? The drive coil's motion is already accounting for the mass of the coil and the coupling. We aren't talking about wave propagation here. We are talking about objects in motion under forces which are directly coupled. There is no energy loss because the if the drive coil is moving, it is already moving the feedback too. If feedback weren't there it would move even more. The energy loss is attributable to the mass difference.
What I neglected to explain is the reason why there is nearly a 90 degree phase shift for any coil based feedback system. So, let me do that...
I've explained in other posts that Electromagnetic transducer are fairly inefficient translators. The same could be said about transformers. They are fairly inefficient as well. Not that there is a better way to do it. It is simply that to go from this to that you have to give up a little in the conversion. So, the natural inefficiencies of the electric pulse to physical motion conversion and then the subsequent physical motion to electrical impulse are what are the bottlenecks here. Those translations directly account for most of the 90 degree shift. Other unavoidable factors are related to the electronics used to create a negative feedback system. Filters and essentially any implementation of a resistor/capacitor pair introduce lag into the processing of the incoming feedback and account for the remainder of the shit. Finally, in a poorly designed system, bleed from the drive coil or wiring account for any additional phase shifting.
What Markrob is not considering is the fact that it is not wave propagation at that point but Newtonian physics that is inducing the feedback current so the calculation is irrelevant here. Regardless of if there has been prior discussion on a topic, that doesn't mean that there isn't yet undiscovered country. No one who posts here was a Neumann engineer or the like. So, yeah, let's keep it in perspective, ok? By the way, no one in their right mind would use steel to couple feedback to drive due to the iron content and the relative permeability of steel for em flux. Want to talk about phase shift, oh boy, that would do it.
By the way, high speed cameras have existed for the exact purpose I described. To make observations about moving systems that they eye itself could not see. I can show you countless physics films and R&D films and military films of high speed cameras with moving objects and a big ruler in the background. That is how this sort of scientific work is done. Also how crash tests are done.
Can I ask, if I am a passenger in a car and I'm in the front seat and you are in the back seat, do we move at the same speed relative to an outside observer? The answer is yes. I'm drive, your feedback. Get it now? Doesn't matter what frequency the car might be vibrating at, we are both going along for the ride simultaneously if we are both strapped to the vehicle...
This animation is not exactly what I described, but it is close enough. The only difference is that in my scenario, the line tracing the sine waves is straight instead of having a 90 degree bend. The line represents the drive to feedback coupling.
Cutting, Inventing & Innovating
Groove Graphics, VMS Halfnuts, MIDI Automation, Professional Stereo Feedback Cutterheads, and Pesto 1-D Cutterhead Clones
Cutterhead Repair: Recoiling, Cleaning, Cloning of Screws, Dampers & More
http://mantra.audio
Groove Graphics, VMS Halfnuts, MIDI Automation, Professional Stereo Feedback Cutterheads, and Pesto 1-D Cutterhead Clones
Cutterhead Repair: Recoiling, Cleaning, Cloning of Screws, Dampers & More
http://mantra.audio
-
Fela Borbone
- Posts: 271
- Joined: Thu Mar 07, 2013 5:22 pm
- Location: Valencia, Spain
Re: Project "Groove Scribe"- A DYI stereo 45/45 head.
Hi
Opcode, I usually learn from your post, and a I thank you for that. But this time I have to make aremark.
In my opinion all this stuff are more about resonances in the part linkin the drive and feedback, that go really fast and reflects inverted inverted or in phase at the edges of the part, depending of the mechanical impedance of the edge( can be open attached th something heavy or elasstic)
Drive and fb can be in node or antinode of this vibrations and have consecuences in their phases
In mr Bodens book reports that in the ortofon head this lags 11microsecs. and is the absoute upper limit for its Fb high freq
-
Fela Borbone
- Posts: 271
- Joined: Thu Mar 07, 2013 5:22 pm
- Location: Valencia, Spain
Re: Project "Groove Scribe"- A DYI stereo 45/45 head.
Appendixx AE pags 2 and 3.
About the alluminium thing , you mean that it shuold have not ring closed shape, and have an cutted off strip like happens in metallic speaker coil fotmers?
About the alluminium thing , you mean that it shuold have not ring closed shape, and have an cutted off strip like happens in metallic speaker coil fotmers?
Re: Project "Groove Scribe"- A DYI stereo 45/45 head.
Just remember, the drive coil doesn't produce vibrations that are imparted upon the feedback coil through the linkage. The drive coil itself produces no physical motive force directly. It produces a shifting Magnetic field electrically. That shifting magnetic field (flux) interacts with the flux from a fixed pole magnet that is held rigidly in place. The flip flopping of the EM flux in the presence of the M flux is what is causing the movement in the transducer system. The AC EM to M interaction is creating vibration that is imparted on both items simultaneously. The flux moves both the drive coil, the linkage and the feedback coil simultaneously. The flux changes cause the drive coil, and anything attached to it, to vibrate in the presence of the magnetic field and the flux is causing the vibrations on all items not the drive coil. The added mass of the feedback is simply a drag on the system. It in no way attributes to lag since it affects the movement of both drive and feedback simultaneously within proper context.
What you are quoting from the Boden book in no way refutes what I'm saying. So, ok, yes. I'm not saying there isn't lag. I do clearly say that there is a 90 degree shift. And, I explain why, which isn't a part of the Boden quote, fyi.
In fact, I can show you on an oscilliscope. If you monitor Feedback on one channel and input on the other channel and put the osc scope in X/Y plitting mode you will never achieve a straight 45 degree line like you would if you fed mono audio into both channels. You get a sort of 45 degree oval shape that indicates a delay amount.
Last edited by opcode66 on Mon Jan 11, 2016 3:05 pm, edited 4 times in total.
Cutting, Inventing & Innovating
Groove Graphics, VMS Halfnuts, MIDI Automation, Professional Stereo Feedback Cutterheads, and Pesto 1-D Cutterhead Clones
Cutterhead Repair: Recoiling, Cleaning, Cloning of Screws, Dampers & More
http://mantra.audio
Groove Graphics, VMS Halfnuts, MIDI Automation, Professional Stereo Feedback Cutterheads, and Pesto 1-D Cutterhead Clones
Cutterhead Repair: Recoiling, Cleaning, Cloning of Screws, Dampers & More
http://mantra.audio
Re: Project "Groove Scribe"- A DYI stereo 45/45 head.
Fela Borbone wrote:Appendixx AE pags 2 and 3.
About the alluminium thing , you mean that it shuold have not ring closed shape, and have an cutted off strip like happens in metallic speaker coil fotmers?
There you go! Slots.
Cutting, Inventing & Innovating
Groove Graphics, VMS Halfnuts, MIDI Automation, Professional Stereo Feedback Cutterheads, and Pesto 1-D Cutterhead Clones
Cutterhead Repair: Recoiling, Cleaning, Cloning of Screws, Dampers & More
http://mantra.audio
Groove Graphics, VMS Halfnuts, MIDI Automation, Professional Stereo Feedback Cutterheads, and Pesto 1-D Cutterhead Clones
Cutterhead Repair: Recoiling, Cleaning, Cloning of Screws, Dampers & More
http://mantra.audio
-
Fela Borbone
- Posts: 271
- Joined: Thu Mar 07, 2013 5:22 pm
- Location: Valencia, Spain
Re: Project "Groove Scribe"- A DYI stereo 45/45 head.
maybe yes maybe not.opcode66 wrote:Fela Borbone wrote:Appendixx AE pags 2 and 3.
About the alluminium thing , you mean that it shuold have not ring closed shape, and have an cutted off strip like happens in metallic speaker coil fotmers?
Ther you go! Slots.
And about the lag within drive and fb assembly,
maybe yes and maybe not
Re: Project "Groove Scribe"- A DYI stereo 45/45 head.
Yeah yeah. Sure sure. I'll allow you to regroup and try to refute my argument. 
Cutting, Inventing & Innovating
Groove Graphics, VMS Halfnuts, MIDI Automation, Professional Stereo Feedback Cutterheads, and Pesto 1-D Cutterhead Clones
Cutterhead Repair: Recoiling, Cleaning, Cloning of Screws, Dampers & More
http://mantra.audio
Groove Graphics, VMS Halfnuts, MIDI Automation, Professional Stereo Feedback Cutterheads, and Pesto 1-D Cutterhead Clones
Cutterhead Repair: Recoiling, Cleaning, Cloning of Screws, Dampers & More
http://mantra.audio