Presto 6N face lift

This is where record cutters raise questions about cutting, and trade wisdom and experiment results. We love Scully, Neumann, Presto, & Rek-O-Kut lathes and Wilcox-Gay Recordios (among others). We are excited by the various modern pro and semi-pro systems, too, in production and development. We use strange, extinct disc-based dictation machines. And other stuff, too.

Moderators: piaptk, tragwag, Steve E., Aussie0zborn

Post Reply
User avatar
rsimms3
Posts: 427
Joined: Thu Mar 14, 2013 10:01 am

Presto 6N face lift

Post: # 35448Post rsimms3
Sun Jun 07, 2015 8:01 pm

I recently purchased a Presto 6N to go along with my 6D Frankenlathe. The original paint had been stripped off the 6N and repainted, but not very well. I decided to strip it bare and start over. I really like the old black wrinkle look from the time period and decided to go that route. Not original, but more of an update. I've completed the process for the main body. A few pictures -

Stripping off the old
Image

Bare body
Image

Dried paint, pre-cure
Image

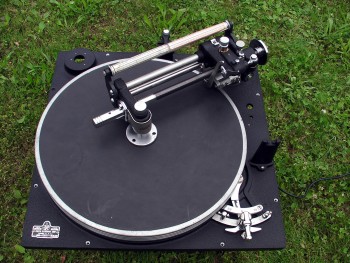
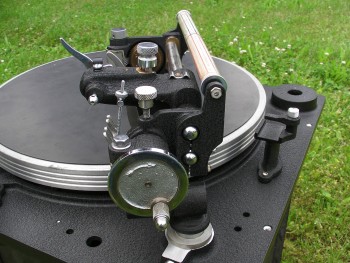
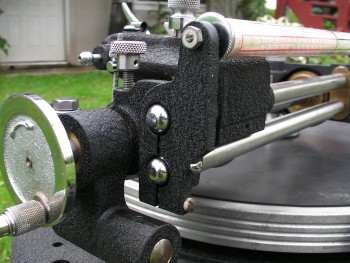
Dried, post-curing in the oven at 200 degrees for an hour, direct sunlight shot
Image

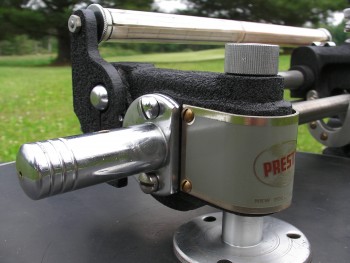
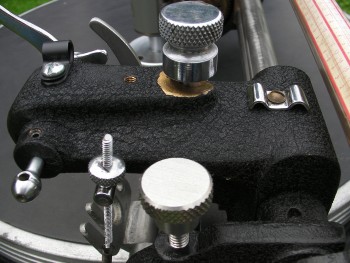
Detail of the textured surface, it looks smudgy at the bottom but that is just out of focus from the camera on my phone
Image


I shot this with VHT High Temp black wrinkle paint. Lots of car guys use it to respray their valve covers or other parts. It's about $10 a can and a single can covered the body. I bought a second can for the overhead and tone arm rests. I'll probably repaint the overhead parts as well to match. Great paint, easy to use (this coming from an absolute painting moron). Just follow the directions on the can. I also used this guide: http://www.build-threads.com/general-car-stuff/diyhow-to-wrinkle-texture-paint/
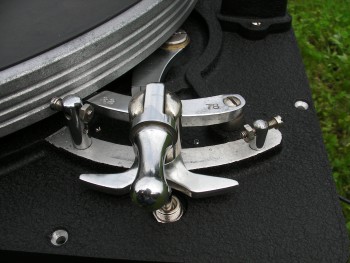
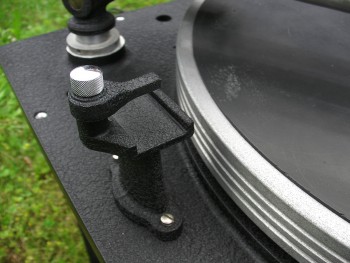
This paint is made in several different colors - black, red, blue, gray, and I think white. I taped over the larger parts and put screws up through the bottom to keep the threads clean for reinstall of parts. Once I have the rests baked and put back on the base I post another picture. Then later I'll post some of the final product/assembly.

User avatar
Aussie0zborn
Posts: 1828
Joined: Sat Mar 11, 2006 8:23 am
Location: Australia
Contact:

Re: Presto 6N face lift

Post: # 35453Post Aussie0zborn
Sun Jun 07, 2015 11:07 pm

That looks great. Looking forward to seeing the finished product.

User avatar
tragwag
Posts: 1265
Joined: Wed Jun 22, 2011 2:30 pm
Location: Providence, RI USA
Contact:

Re: Presto 6N face lift

Post: # 35462Post tragwag
Mon Jun 08, 2015 2:25 pm

this is great! kudos
making lathe cuts on a Presto 6N, HIFI stereo cuts on vinylrecorder
at Audio Geography Studios, Providence, RI USA
http://www.audiogeography.com

User avatar
rsimms3
Posts: 427
Joined: Thu Mar 14, 2013 10:01 am

Re: Presto 6N face lift

Post: # 35503Post rsimms3
Wed Jun 10, 2015 10:02 pm

I finished painting the tone arm and overhead rests, but those are sort of boring so I won't post any pictures of those by themselves. Tomorrow I'll mask off the stripped parts and shoot some paint on some/all of them. Not sure if I have enough paint for all of them in one round.

Overhead pre-disassembly
Image

Stripped parts
Image

As I was drying everything off, I noticed a hole in the back of the piece that holds the ratchet mechanism etc, lubrication hole? Do other overheads have this as well? I've never seen this particular feature discussed, just curious.
Image Image

User avatar
ROLANDJAYS
Posts: 287
Joined: Sun Apr 14, 2013 3:48 am

Re: Presto 6N face lift

Post: # 35507Post ROLANDJAYS
Thu Jun 11, 2015 11:05 am

Looks like oil goes there

User avatar
dimi751
Posts: 266
Joined: Fri Sep 07, 2012 9:24 pm

Re: Presto 6N face lift

Post: # 35544Post dimi751
Sat Jun 13, 2015 7:59 pm

Nice job on the paintwork looking forward to the finish product

User avatar
rsimms3
Posts: 427
Joined: Thu Mar 14, 2013 10:01 am

Re: Presto 6N face lift

Post: # 35644Post rsimms3
Sat Jun 20, 2015 5:18 pm

Finished painting and assembling the visible parts (still need to mount the motor and build a box or stand). Click the pics for full size versions on Image Bam.

ImageImage Image Image Image Image Image Image

User avatar
studiorp
Posts: 761
Joined: Thu Nov 01, 2007 6:55 pm

Re: Presto 6N face lift

Post: # 35648Post studiorp
Sun Jun 21, 2015 4:43 am

Wonderful, bravo !

User avatar
electronrancher
Posts: 37
Joined: Mon Apr 06, 2015 10:44 pm

Re: Presto 6N face lift

Post: # 35662Post electronrancher
Mon Jun 22, 2015 9:14 pm

Wow, really nice! Looks like a great summer project!

Tell me, what did you use to strip the old paint? And to clean everything? It looks like you got years worth of grime off so easily - even the texturing in the knobs looks clean!

I for one would be interested in hearing a bit more about your restoration techniques, you seem to have quite a knack for it!

User avatar
rsimms3
Posts: 427
Joined: Thu Mar 14, 2013 10:01 am

Re: Presto 6N face lift

Post: # 35664Post rsimms3
Mon Jun 22, 2015 9:41 pm

Thanks guys! Actually, this is the first thing I've actually stripped and repainted. I used Aircraft Remover from Walmart to strip all the painted parts. It's in an aerosol can for easy application. Some of the parts that were cast with deep holes took an extra application or two along with some scrubbing with a wire brush. After I stripped it, I cleaned it with Goo Gone orange citrus cleaner prior to painting. One of the knobs is a replacement, some how I screwed up the threads so I went from 24 to 20 thread which necessitated a new knob from Amazon. It's the knob in the foreground in the 2nd to last picture, if you look closely it's natural steal instead of a chrome finish. Otherwise I used carburetor cleaner to clean off the old crusty lubricants and finished with Goo Gone.

As for the paint, you need to give it a full 48 hours to dry and then be careful transferring to your oven for baking. It has to go on thick to wrinkle and then it stays wet under the top layer for a long time. Even at 48 hours with any humidity I would consider it still wet and the top layer can slide. Also, when you bake it don't allow any part that has paint on it to lay on a pan or a metal rail or anything because the paint will flatten or take the shape of whatever it's touching. I had to make a few stands to hold items during baking so they wouldn't flatten, ruined a couple pieces rushing the process not knowing what would happen.

Also, if I had it to do over I would have painted the ends outside the speed control stops, farther in on the overhead mounting hole in the base, and more for the knife lowering knob. It's cool to see the brass but looks a little sloppy with so much if showing on the overhead carriage.

User avatar
studiorp
Posts: 761
Joined: Thu Nov 01, 2007 6:55 pm

Re: Presto 6N face lift

Post: # 35668Post studiorp
Tue Jun 23, 2015 2:27 am

only a curiosity, which is the weight the platter of 6n ?

User avatar
The Shank
Posts: 340
Joined: Tue Jun 15, 2010 11:02 am
Location: France
Contact:

Re: Presto 6N face lift

Post: # 35670Post The Shank
Tue Jun 23, 2015 5:52 am

WoooOOoooWwww! I wish I could get the same one here just for me...
http://www.myshank.com
skype : steven.myshank

* Diamond cutting stylus officials/prototypes
* Resharpening services
* Blank records
* Cutting lathe

User avatar
rsimms3
Posts: 427
Joined: Thu Mar 14, 2013 10:01 am

Re: Presto 6N face lift

Post: # 35712Post rsimms3
Thu Jun 25, 2015 8:41 pm

studiorp wrote:only a curiosity, which is the weight the platter of 6n ?
I just weighed mine and it was 11.5 pounds.

User avatar
dimi751
Posts: 266
Joined: Fri Sep 07, 2012 9:24 pm

Re: Presto 6N face lift

Post: # 35750Post dimi751
Sun Jun 28, 2015 5:47 pm

Wow that looks nice !! Fantastic job

User avatar
crowesBR
Posts: 93
Joined: Mon Apr 11, 2016 7:17 pm
Location: San Francisco, CA
Contact:

Re: Presto 6N face lift

Post: # 42426Post crowesBR
Wed May 11, 2016 2:41 am

Wow. Amazing

How did you cleaned your plate? Looks really nice.

I notice most of the old Presto's have a discolor, oxidize, corrode plate,...

Tried with a few metal polish but that didn't work.
Any tips?

Image

Post Reply